Made a guide for handling the DMG DMU80t Machine.
It's still in its rough state, need a lot of editing
try it, give comments on the error I made.... (none of them done by me ofc... :)
you will find it here https://www.tomasw.com/millplus/
Sunday, December 16, 2018
Friday, December 14, 2018
Millplus IT, DMG DMU80T, G7
Change work plane in 4 and 5 axis machines
This is totally new to me, I have to use the machine on and off in a couple of years but never had the energy to take the G7 function to my mind.
It can be a big deal to handle especially on the machine with a rigid table, indexing mill head, and rotating C-axis..
This indexing spindle head can be turned 0 to -90 degrees only.
With the G7 function, you can order the machine to mill/drill of the opposite face of the part where the milling head can not reach. The smart head of the machine knows that it needs to repositioning the C-axis to reach the face automatically, brilliant, I know. Then comes the question, what happens to the zero point, axis and axis directions, and so on.
I will show an easy method to start with the top plane on the workpiece and change to the nearest plane (Right side/ X-) and what happens to the axis and axis directions.
The program
G54 I97
T12 M6 (drill)
S1000 F200 M3
M57 (on our machine, unlock head angle over -31deg)
G0 X10 Y10 Z10 (positions before)
G1 X0 Y0 Z0 (touch the Zeropoint with the tool)
G0 X-100 Z100 (safe position before Indexding the head)
G7 B5=-90 L1=2 (turn the coordinate system to the side of the workpiece)
G0 X10 Y10 Z10 (position before)
G1 X0 Y0 Z0 (touch the same zero on the right side of the workpiece)
G0 X100 Z100 (Go up in X+ and to the right in Z+, Wierd?)
G7 L1=1 (Leave G7, see the late comment down below)
M30
The machine axis, C-axis is the table, not the spindle and I've got no A-axis..

The machine has been programmed to turn the tool from top zero to X- side zero on the edge
It should simulate drilling on the top and the 90 degrees X- side according to the picture

The video will show that the program will meet the zero point from 0deg and -90deg

Charming G-code, no doubt on that.
But the machine make the wierd stuff, When you are in the -90deg, the axis shifts.
You got the Z- axis right in to the workpiece (pic). thats our old (real) X+
Our new X is our old Z, you got X+ for tool up from the table and X- for tool down to the table, Y stays the same.
I've learn from a wise man that if you go from the top of the workpiece to the left/X-side, just tilt the workpiece that way in your mind, then the axis makes sense, tilt your computer to the right and you see it. the workpiece zero points is the same all on the workpiece.
still learning on this.
Is the example hard to understand? yeah, it is and I made this most to understand it myself.
Please leave a comment if you got issues with it, you can help me change the content so it will help anyone who needs the instruction in the best way.
All this made in a Dekel Maho DMU80T
Nice weekend ppl
/T
This is totally new to me, I have to use the machine on and off in a couple of years but never had the energy to take the G7 function to my mind.
It can be a big deal to handle especially on the machine with a rigid table, indexing mill head, and rotating C-axis..
This indexing spindle head can be turned 0 to -90 degrees only.
With the G7 function, you can order the machine to mill/drill of the opposite face of the part where the milling head can not reach. The smart head of the machine knows that it needs to repositioning the C-axis to reach the face automatically, brilliant, I know. Then comes the question, what happens to the zero point, axis and axis directions, and so on.
I will show an easy method to start with the top plane on the workpiece and change to the nearest plane (Right side/ X-) and what happens to the axis and axis directions.
The program
G54 I97
T12 M6 (drill)
S1000 F200 M3
M57 (on our machine, unlock head angle over -31deg)
G0 X10 Y10 Z10 (positions before)
G1 X0 Y0 Z0 (touch the Zeropoint with the tool)
G0 X-100 Z100 (safe position before Indexding the head)
G7 B5=-90 L1=2 (turn the coordinate system to the side of the workpiece)
G0 X10 Y10 Z10 (position before)
G1 X0 Y0 Z0 (touch the same zero on the right side of the workpiece)
G0 X100 Z100 (Go up in X+ and to the right in Z+, Wierd?)
G7 L1=1 (Leave G7, see the late comment down below)
M30
The machine axis, C-axis is the table, not the spindle and I've got no A-axis..

The machine has been programmed to turn the tool from top zero to X- side zero on the edge
It should simulate drilling on the top and the 90 degrees X- side according to the picture

The video will show that the program will meet the zero point from 0deg and -90deg
As you see on the video, the G7 L1=1 just angle the head to zero and I was ½inch from killing my expensive tool laser unit at the end of the video. Try G7 G5=0 L1=1 instead (or L1=2) for keeping the zero on the tool edge.
Be safe, mistakes cost a lot and the wise man does not know everything.
A picture showing the zero position in -90deg, the corner is the zero point

Charming G-code, no doubt on that.
But the machine make the wierd stuff, When you are in the -90deg, the axis shifts.
You got the Z- axis right in to the workpiece (pic). thats our old (real) X+
Our new X is our old Z, you got X+ for tool up from the table and X- for tool down to the table, Y stays the same.
I've learn from a wise man that if you go from the top of the workpiece to the left/X-side, just tilt the workpiece that way in your mind, then the axis makes sense, tilt your computer to the right and you see it. the workpiece zero points is the same all on the workpiece.
still learning on this.
Is the example hard to understand? yeah, it is and I made this most to understand it myself.
Please leave a comment if you got issues with it, you can help me change the content so it will help anyone who needs the instruction in the best way.
All this made in a Dekel Maho DMU80T
Nice weekend ppl
/T
Friday, December 7, 2018
Nice pocket mill, DMG DMU 80T
The only thing this week, I did some milling in the DMU80T
Programmed in the Millplus IT v520 in IPP mode (mostly)
Made a video of it :)
The sound is 10 seconds to late, doesn't matter much, it's a cool video.
Check me out, laid back, drinking coffee in right on the video at 0.28-ish, no stress there at all.
Spindle speed 5000 rpm (S5000)
Table Feed is 1000 mm/min (the metric stuff, fast as...) You inch guy, count to get the real feed.. one inch is 25.4 mm (got to be 39.3 inch a minute? (inch/min?) )
I think the feed is to high, but it works on a single piece...
Oooh forgot, I use a 10 mm cabide endmill, the workpiece is in brass.
Have a nice weekend :)
/T
Monday, November 19, 2018
NX turning, NX 7.5 CAD/CAM and later, whole course, for free
NX Turning, Manufacturing in NX
Made a website for the Turning part of Siemens NX training.It's the same as the mill part but adapted for turning parts and includes threading, there are also some video instructions attached to this instruction that will explain the work thoroughly.
It shows file management, sketching, model (Solid modeling), tool handling, and manufacturing.
It's free to use.
It fits (most parts/tested in) NX6, NX7.5, and NX11
You will find it at https://www.tomasw.com/nxturning/nxturning.html
Made it from some weird conversion site, word to HTML, it may be funny in some parts.
Made a new apps for android.
These apps are the same as the mill and turning training material made for NX n an easy to use format,You will find the mill app right here
You will find the turning app here
please comment the above, need feedback so I can make those resources better and more useful.
/T
Tuesday, November 13, 2018
NX 7.5, converting units, inch to mm, mm to inch
If you got a model from internet, www.grabcad.com 's library or from some other source, you may end up with the "wrong" units on your model.
In NX 7.5 there is no drop down menu to make a unit conversion between metric and imperial units.
But there is a way anyway. In NX they did add hundreds (?) of DOS-programs that works like drop down menu command, but they did not added them the drop down menu object in the NX program.
If you'r familar to the CMD-command promt, go to the picture, otherwise follow the instruction.
Go to Search in windows, You got it down by the windows logo (start menu)
Write CMD in the search, click the Command promt that appear.
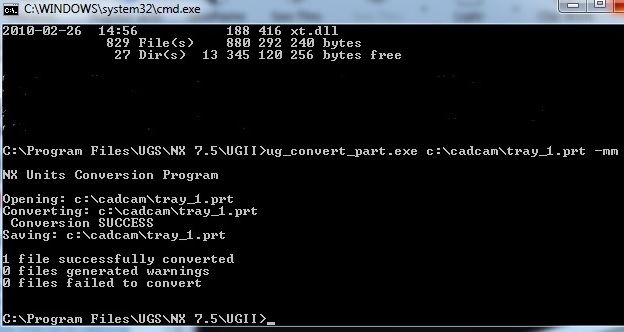
Now write C:\program files\nx 7.5\ugii\ C:\cadcam\model.prt -mm and enter
the "C:\cadcam\model.prt" should be you own part name and folder and "-mm" the conversion you want to preform I assume that you use -inch if you'r going that way, but I'v never tested this.
see the example down below
I'm sorry for the "too big" image, but it's hard to see othervise, I hope that this doesn't kill the layout on your mobile unit
In NX 7.5 there is no drop down menu to make a unit conversion between metric and imperial units.
But there is a way anyway. In NX they did add hundreds (?) of DOS-programs that works like drop down menu command, but they did not added them the drop down menu object in the NX program.
If you'r familar to the CMD-command promt, go to the picture, otherwise follow the instruction.
Go to Search in windows, You got it down by the windows logo (start menu)
Write CMD in the search, click the Command promt that appear.
Now write C:\program files\nx 7.5\ugii\ C:\cadcam\model.prt -mm and enter
the "C:\cadcam\model.prt" should be you own part name and folder and "-mm" the conversion you want to preform I assume that you use -inch if you'r going that way, but I'v never tested this.
see the example down below
I'm sorry for the "too big" image, but it's hard to see othervise, I hope that this doesn't kill the layout on your mobile unit

NX 7.5 CAD/CAM and later, whole course, for free
I'v have a week with a basic NX 11 CAD/CAM course, the newbie one.
So when my student are doing their training on theres computers, I got some free time for my own work.
I created my training instruction as an online version, just for you(!!!). with both CAD and CAM, it's the one I use when I educate in CAD and CAM
It's a well-utilized time. (?)
Because I am a bit lazy I used Words translating tool to translate, so the language can be somewhat rough, please comment on things I missed and things that wrong linguistically.
It fits NX7.5, but most of the content fits even NX11
Use it for free even for professional use (It can't be wrong to paypal some $ if you use it to make money for yourself)
Do link my blog or webpage.
I hope that you find it useful
==>NX Milling instructions<==
More of the same will come later, NX turning, fanuc basic course, siemens 840D basic course, Millplus IT basic system. just wait :)
Friday, October 26, 2018
just videos, the week...
This week, lot of progress
For my students, they learn a lot.
Check out his weeks videos:
My own pleasure:
Make a comment or a complaint, ("-do not do it that way" and so on....)
We can take a discusion about everything, I'v got close to 35yrs in this, I know a lot, but not everyting so your comment can make.. me to relearn? (or not :)
have a nice weekend ppl !!!!
/T
Subscribe to:
Posts (Atom)